Welcome to this comprehensive guide on Salesforce User Security! In today’s data-driven world, safeguarding your information is paramount, and Salesforce provides a robust framework to achieve this. Whether you’re a new Salesforce user or an experienced administrator looking to refine your security model, understanding how access is granted and restricted is crucial. This guide will walk you through the fundamental concepts of Salesforce security, including Profiles, Permission Sets, Org-Wide Defaults, and Sharing Rules. We’ll explore best practices, clarify common misconceptions, and provide a clear implementation roadmap to help you build a secure, scalable, and user-friendly Salesforce environment. Let’s dive in and unlock the power of Salesforce security!
Profiles
- Definition: Profiles are the baseline of user access in Salesforce. Every user must be assigned exactly one profile.
- Purpose: They define what a user can do within Salesforce by controlling object permissions (Create, Read, Edit, Delete), field-level security, tab visibility, app access, and login settings.
- Key Point: Profiles are broad and role-based. Think of them as the foundation of a user’s permissions.
Further Reading: https://help.salesforce.com/s/articleView?id=platform.admin_userprofiles.htm&type=5
Profiles in Salesforce are the foundation of a user’s access. Every user must be assigned exactly one profile, and that profile defines the baseline permissions they receive. A profile controls what users can do at the system and object level: things like creating, reading, editing, or deleting records, viewing fields, accessing tabs and apps, and managing login settings. Because profiles establish this foundation, they are not meant to be overly specific to each individual. Instead, they should reflect broad categories of user responsibilities, such as “Safety User,” “Standard User,” or “System Administrator.”
The right way to think about profiles is as a starting point, not the final layer of access. Use them to provide the minimum permissions needed for a group of users to perform their core job functions. If someone needs more access beyond what their profile allows, extend it with permission sets or permission set groups, rather than creating new profiles. This approach keeps your org clean and scalable. In short, profiles should answer the question: What does this type of user need to do at the most basic level? Everything else should be layered on with permission sets.
Permission Sets
- Definition: Permission Sets are additive collections of settings and permissions that extend a user’s access beyond what their profile grants.
- Purpose: They let you grant specific privileges to individuals without having to create or clone new profiles.
- Key Point: A user can have multiple permission sets, but only one profile. This makes permission sets a flexible way to tailor access on top of the profile baseline.
- Further Reading: https://help.salesforce.com/s/articleView?id=platform.perm_sets_overview.htm&type=5
Permission sets in Salesforce are designed to extend access beyond the baseline established by a profile. While every user has just one profile, they can be assigned multiple permission sets, making them a flexible way to fine-tune security. A permission set can grant additional object permissions, field-level security, system privileges, or app access that a user’s profile does not already provide. This allows administrators to avoid creating countless custom profiles for every slight variation in access needs.
The best way to think about permission sets is as add-ons or building blocks that layer on top of profiles. Start by giving users the least amount of access they need through their profile, then use permission sets to grant specialized access to certain individuals or groups without affecting everyone else. For example, if most standard users don’t need to import data but a few do, assign a permission set to those users rather than editing the entire profile. This modular approach keeps your org simpler, reduces maintenance, and gives you more flexibility to adapt as requirements change.
Can I Just Use Profiles?

The short answer is yes. If you already have an established structure built entirely around profiles, you can continue to use them to manage access. However, this approach usually leads to a lot of duplication. Every time you need a slight variation in access (for example, one group of safety users needs access to assessments while another group does not), you may find yourself cloning and customizing profiles just to accommodate that difference. Over time, this creates a long list of profiles that are difficult to maintain, audit, and scale as your org grows.
The real advantage of profiles is their tight integration with page layouts and Lightning record pages, since these assignments are often made at the profile level. But profiles alone are not very flexible when it comes to granting specialized access to only a subset of users. That’s where permission sets come in. Instead of creating more profiles for every variation, you can define one or two baseline profiles for broad roles (like Loss Prevention or Safety) and then use permission sets to “layer on” additional access for individuals or small groups. This reduces duplication, simplifies administration, and makes your security model far easier to manage in the long run.
Org-Wide Defaults (OWDs)
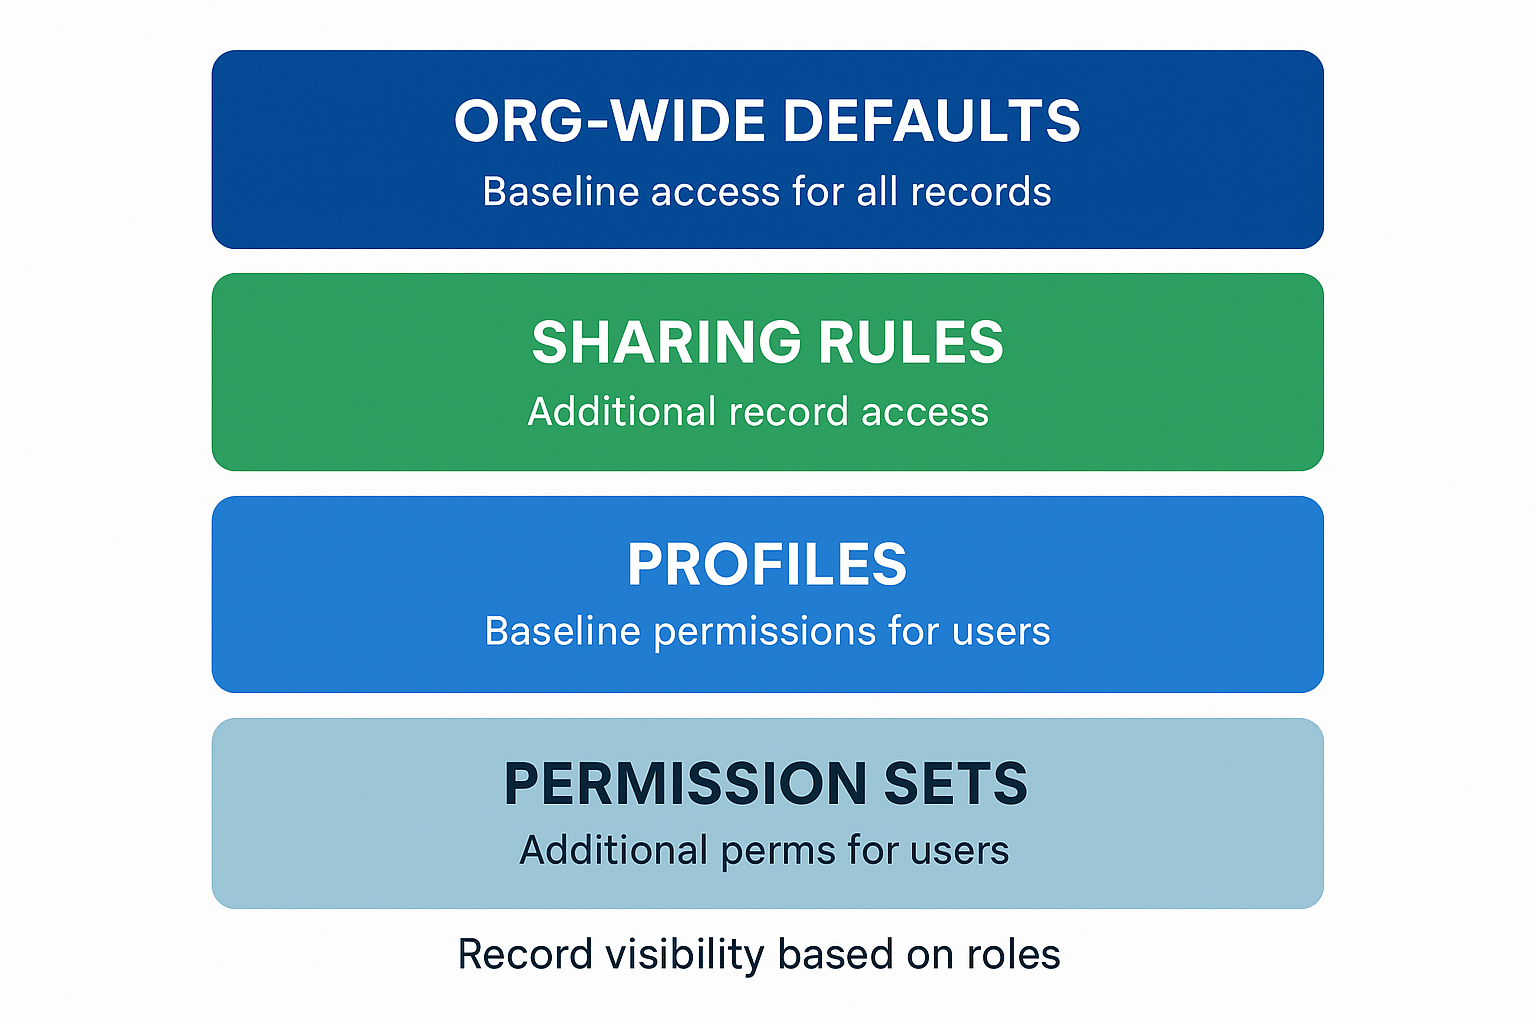
- Definition: Org-Wide Defaults are the baseline security setting that defines the most restrictive level of record access for all users in the organization.
- Purpose: They control whether records are Public Read/Write, Public Read Only, Private, or (for some objects) Controlled by Parent. This sets the starting point for record visibility before any sharing rules, roles, or manual sharing are applied.
- Key Point: OWDs establish the minimum access for records. Additional access can only be granted on top of them through role hierarchy, sharing rules, teams, or manual sharing.
- Further Reading: https://help.salesforce.com/s/articleView?id=platform.security_sharing_owd_about.htm&type=5
Org-Wide Defaults (OWDs) in Salesforce establish the baseline level of record access across the entire organization. They determine whether records in an object are visible to everyone or restricted only to their owners and those above them in the role hierarchy. For each object, administrators can set the default access level to options. In some cases, objects can also inherit access through a “Controlled by Parent” setting. By defining these defaults, OWDs create the most restrictive access possible, which can then be gradually opened up through sharing mechanisms.
The correct way to think about OWDs is as the foundation of record-level security. They represent the lock on the door, and everything else, such as role hierarchy, sharing rules, manual sharing, or team access, are the keys that open it. Best practice is to set OWDs as restrictive as business requirements allow, usually Private or Read Only, and then use sharing methods to provide broader access where needed. This ensures sensitive data is protected by default while still allowing collaboration and transparency when appropriate. By starting with strict OWDs and layering access on top, you maintain a secure and manageable data-sharing model.
Sharing Rules
- Definition: Sharing Rules control record-level access by opening up visibility beyond the organization-wide defaults (OWDs).
- Purpose: They allow you to automatically share records with groups of users based on criteria (for example, all Sites where Region = “West”) or ownership.
- Key Point: Sharing rules grant additional visibility, but they can never restrict access below what a user already has through their role hierarchy, profile, or permission sets.
- Further Reading: https://help.salesforce.com/s/articleView?id=platform.security_about_sharing_rules.htm&type=5
Sharing rules in Salesforce are a way to expand record-level access beyond what is defined by Org-Wide Defaults (OWDs). They allow administrators to automatically open up visibility to groups of users based on ownership (for example, all records owned by users in the Loss Prevention role) or by criteria (for example, all Sites where District = North East). Sharing rules do not replace the baseline OWDs but instead build on them, granting broader access where collaboration is needed. Importantly, sharing rules can only add access; they can never restrict it below what is already available through roles, profiles, or permission sets.
The right way to think about sharing rules is as a tool for enabling teamwork and cross-functional visibility without compromising the principle of least privilege. Start with restrictive OWDs to protect data, then use sharing rules to strategically open up records where business processes require collaboration. For example, you might allow the Human Resources team to view Incidents owned by the Loss Prevention team but not edit them, or let regional groups share Sites based on geography. By applying sharing rules thoughtfully, you maintain strong data security while ensuring the right people can access the information they need to work effectively.
Configuring Record Visibility within your Salesforce Instance
When designing record visibility in Salesforce, it is helpful to distinguish between relevance visibility and security visibility. Relevance visibility is about improving usability and efficiency: users are technically allowed to see a broad set of records, but it may not make sense for them to view everything all at once. For example, a regional manager may only care about the stores in their region, even though they could be given access to all stores. In this case, the right solution is not to lock down access but to guide users toward relevant information through tools like custom list views, pinned filters, or favorites. This keeps the sharing model simple and avoids unnecessary complexity while still helping users focus on the data that matters to them.
On the other hand, security visibility deals with true restrictions where data should not be visible outside of a defined audience. These situations involve sensitive or confidential records, such as investigations into theft by senior managers, cases involving assault, or other high-profile issues, where exposure could create legal, ethical, or operational risks. In these cases, list views or filters are not sufficient. You need to enforce restrictions directly in Salesforce through Org-Wide Defaults, role hierarchy, sharing rules, and public groups so that only the appropriate individuals (for example, HR investigators or executive security teams) can see the records. This ensures that sensitive data is protected, audited, and only accessible to those with a legitimate need.
The key to organizing your thoughts around record visibility is to categorize objects and records by their purpose and sensitivity. Start by asking: “Should all users in this role or department be able to see every record of this object, or should visibility depend on ownership, region, or record type?” For example, Sites and People might primarily fall under relevance visibility since most users can technically see them, but filtering by region or industry helps them focus. In contrast, Investigations or Safety Incidents may require security visibility, especially if certain record types (like Workplace Violence Investigations) must only be seen by a very narrow audience. Using record types in this way makes it easier to write sharing rules that target only the records that need restriction, while leaving general-purpose records open for collaboration.
Finally, when implementing sharing rules, think in terms of who should collaborate and why. Public groups can be created around functional teams (like “Western Region” or “ORC Investigators”), which then serve as the building blocks for sharing rules. Instead of granting visibility directly to individuals, assign them to groups, and then apply sharing rules based on those groups and record criteria such as record type or ownership. This approach not only simplifies administration but also ensures consistency: when someone joins or leaves a team, you only update the group membership, and the sharing model adapts automatically. By combining thoughtful categorization of records with the distinction between relevance and security visibility, you create a sharing strategy that is both secure and user-friendly.
Implementation Guide
Step 1. Org-Wide Defaults (OWDs)
- Org-Wide Defaults are set at the object level. For any object that contains sensitive business data where you need to restrict record visibility for security reasons, set the object’s OWD to Private. This is done in Setup → Sharing Settings → Organization-Wide Defaults → Edit.
- Salesforce uses an additive sharing model. When an object is set to Private, users can only see the records they own (or those shared with them). To expand visibility, you must use tools like role hierarchy, sharing rules, and public groups.
- Do not restrict platform or setup objects (for example, objects used in configuration or background processes) or you may block required system functions. Focus OWD changes on business data objects such as Records, Sites, Safety Incidents, Actions, or other custom objects that represent your organization’s data.
Step 2. Broad Access User Groups
- Start by identifying broad groups of users who should have the widest access (for example, Senior Leadership or Regional Directors). This step focuses on security visibility, not relevance filtering.
- Define and name these groups, and list a few representative users for each.
- Remember: a user can belong to multiple groups.
- Run through mental test scenarios:
- Should all members of this group see the same Assessments?
- Should they all see the same types of Cases?
- Aim to make these groups as broad as possible without compromising security. Broader groups keep your model simpler and easier to maintain.
- Once you’re confident about these top-level groups, move to Step 3.
Step 3. Narrow Access Needs
- This step identifies the smallest necessary bands of access. The finer the sharing requirements, the more complex your security model becomes. For example, if a group of users needs to see a very specific record type tied only to a single store, this will require advanced configuration and maintenance.
- If you identify these edge cases, consult with an experienced Salesforce architect or admin to design a sustainable model (you may need criteria-based sharing or Apex-managed sharing).
- If the requirement is limited to individual users (e.g., a Store Manager who should only see records they own), then OWD Private with ownership-based access may be sufficient. In this case, continue to Step 4.
Step 4. Map Other User Access
- Continue the process from Step 2, assigning users into logical groups until all users have a home in your access model.
- It is often easier to design this in Excel or another spreadsheet tool first—list users, their roles, and the records they need to access—before building in Salesforce. This gives you a clear blueprint to follow.
Step 5. Create Public Groups
- Public group names should be short, descriptive, and consistent (for example, “Senior Leadership – View All” or “West Coast Incidents – Read/Write”).
- Create your public groups and add users as needed: Setup → Public Groups.
- Consider nesting roles, subgroups, or permission sets into groups for flexibility, rather than always adding individuals directly.
Step 6. Configure Sharing Rules
- Sharing rules define conditions where records that meet certain criteria are automatically shared with a public group in either Read-Only or Read/Write mode.
- When configuring rules, make sure the rule’s logic matches the group’s purpose. For example, a “West Coast Incidents” group should only receive incident records tagged with that region.
- You can create multiple sharing rules for the same group if they need access to more than one type of record.
Step 7. Test and Validate
- Use the Login As User feature (Setup → Users) to verify that users see only the appropriate records.
- If the option is missing, check Setup → Login Access Policies (https://help.salesforce.com/s/articleView?id=000386710&type=1).
- To force logout after using Login-As, review Setup → Session Settings → “Force relogin after Login-As-User.”
- In addition to logging in as users, also consider using “View All Users” → Sharing button on a record to confirm which users currently have access and why. This is invaluable for troubleshooting.
Conclusion
Mastering Salesforce user security is an ongoing journey that requires a clear understanding of its core components and a strategic approach to implementation. By diligently applying Profiles, Permission Sets, Org-Wide Defaults, and Sharing Rules, you can construct a robust security model that not only protects sensitive data but also empowers your users to collaborate effectively. Remember to start with the most restrictive access, layer on additional permissions as needed, and always distinguish between relevance and security visibility.
The implementation guide provided offers a structured path to building your security framework. By following these steps and regularly testing your configurations, you’ll ensure that your Salesforce instance remains secure, compliant, and optimized for your business needs. Security is not a one-time setup; it’s a continuous process of review and refinement. Stay proactive, stay informed, and your Salesforce data will remain safe and accessible to the right people at the right time. If you have additional question or want to learn more about us, get in touch. Happy securing!